SmartScope - Debug checklist: Difference between revisions
Jump to navigation
Jump to search
(Created page with "In case something happened to your SmartScope, you can send in your SmartScope for repair, or (since you're into electronics anyway) you might try to give it a shot yourself....") |
No edit summary |
||
| Line 26: | Line 26: | ||
|- | |- | ||
| NEG_1.1V|| || || || || || || | | NEG_1.1V|| || || || || || || | ||
|} | |||
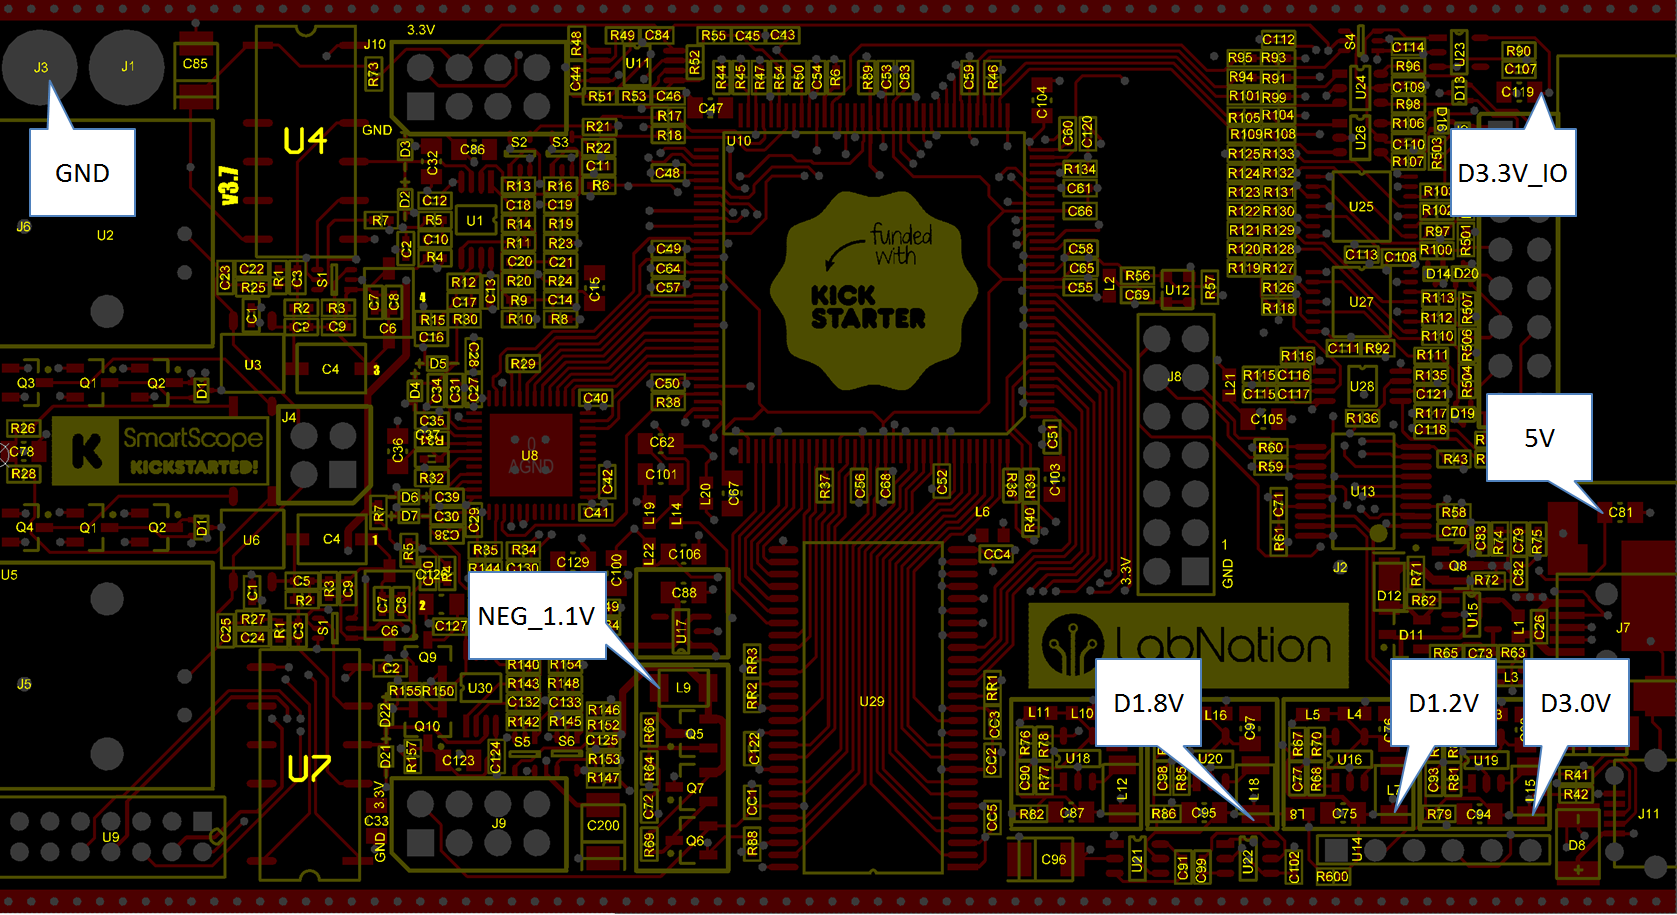
[[File:debugPoints.png]] | |||
=Verifying supply rail voltages= | |||
Next, power the SmartScope and measure all voltages to see whether they're close enough to their expected value. | |||
Note: in the app, switch to Digital mode to power the D3.3V_IO net | |||
{| class="wikitable" | |||
! | |||
! Measured voltage | |||
|- | |||
| GND || | |||
|- | |||
| 5V || | |||
|- | |||
| D3.3V_IO|| | |||
|- | |||
| D3.0V|| | |||
|- | |||
| D1.8V|| | |||
|- | |||
| D1.2V|| | |||
|- | |||
| NEG_1.1V|| | |||
|} | |} | ||
Revision as of 10:47, 1 March 2017
In case something happened to your SmartScope, you can send in your SmartScope for repair, or (since you're into electronics anyway) you might try to give it a shot yourself. This document gives you a starting point in pinpointing what might be the problem.
Checking for short-circuits
The first thing to check is whether some power rails might be shorted. This might happen when a component was exposed to excessive currents. Check whether none of the nets in the table below are connected to each other. Make sure you the image below to find out where to probe the nets.
| GND | 5V | D3.3V_IO | D3.0V | D1.8V | D1.2V | NEG_1.1V | |
|---|---|---|---|---|---|---|---|
| GND | |||||||
| 5V | |||||||
| D3.3V_IO | |||||||
| D3.0V | |||||||
| D1.8V | |||||||
| D1.2V | |||||||
| NEG_1.1V |
Verifying supply rail voltages
Next, power the SmartScope and measure all voltages to see whether they're close enough to their expected value. Note: in the app, switch to Digital mode to power the D3.3V_IO net
| Measured voltage | |
|---|---|
| GND | |
| 5V | |
| D3.3V_IO | |
| D3.0V | |
| D1.8V | |
| D1.2V | |
| NEG_1.1V |
